Saturday, 30 August 2014

Line 'em Up


Is it me or do lip liners have a sort of stigma connecting them to more mature ladies and bad past beauty trends? When I hear lip liner I picture a grandma shakily applying it on a stool at her vanity before she puts on her favourite lippy. That's some vivid imagery for you right there that is; but really, lip liners can completely change how your lipstick looks for the better!


Lip liners not only prevent your lip colour from bleeding into any fine lines around your lips but also make everything look a lot more crisp and clean. If you want to go one step further, of course you can take some concealer around the edges of your mouth but for today we're just talking liners! Like an eyeliner, lip liner defines, preps and finishes off a bold or neutral lip beautifully. It wasn't until I thought of doing this post and then laid out all of my liners that I realised how many I actually have.. Standard blogger problem I think. I've got mostly drugstore brands with one or two mid-range brands thrown in. Liners are great on their own for a more matte and long wearing option or underneath lipstick or gloss as a prep step. 

If I'm donning a bold lip then I always, always line my lips and most of the time fill them in as well just to give a good base and even out the colour. With a more natural lip colour I don't necessarily wear liner unless I want to do a sneaky overdraw of my lips to make them look a little more full. (I'm not talking Kardashian/Jenner overdraw here ladies) To do this I generally opt for Maybelline's SuperStay liner in Rosewood which is the closest shade to my lip colour that I've found; Without looking like I've had bad lip injections, I just slightly, ever so slightly shade under the middle part of my bottom lip to create a shadow. This is the most natural way for your lips to appear larger and with a pencil shade close to your own, no one will be any the wiser! 

For me, a red lip isn't a red lip without a clean cut edge with liner! Matching the undertones is also important because you don't want an orange line around the edge of your mouth with a deeper, warm red lip colour unless of course that's what you were intending which actually could be an interesting ombré look! My choice for affordable liners would definitely have to be from NYX- they're easily accessible, great shade range and you can afford one of every bold lip that you tend to wear. If you have a Kiko near you, then hit it up. I bought a few of their lip liners amongst other bits in Europe last year and they're fab. You can't really go wrong with any drugstore lip liners I don't think unless they're smudgey or so rough that they pull on your lips. 
I've pushed the image of an old lady applying shaky lip liner out of my head and I am officially a convert. If you don't usually use lip liner or had the same thought process as me, give it a go! Your lips will look all the better and everything will just look that little bit more polished.


Saturday, 23 August 2014

Getting that Glow!


Everybody's always aiming for the Victoria's Secret glow that we see in all their campaigns and on the glitter runway when those leggy ladies are strutting their stuff! For those of us who don't wake up looking like Candice Swanepoel, there are many different things we can do and put on our face to fake the glow. Fake it 'til you make it ladies!

There are different types of highlighting products on the market which for the most part can be separated into cream and powder categories. More and more we're seeing 'new technology' in products on the market that aim to give you an even more 'natural' look to your highlight. Cream contouring/highlighting that we see so much on Instagram and YouTube is more about creating depth and structure to your face rather than a glow. In the past I've been a bit afraid of highlighting the high points of my face mainly because I felt like it drew attention to any pores and made them look larger but more recently, I've found the best way to apply and the right products for me which doesn't make me look like a discoball belonging in Saturday Night Fever! I prefer to keep my highlight for the evening generally but you know, sometimes things are lookin a lil drab so you gotta add some glow in the day.

My glow endeavour began with Benefit's Sun Beam which is a gorgeous bronzey glow, perfect for tanned skin in the Summer which is when I bought it but of course kept it unopened until a few months ago.. Classic me. Anywho, regardless of what it would look best with, I was getting ready one evening and thought it was time to crack it open. I dabbed it on the high points of my cheekbones, down my nose and on my cupid's bow- all the places the experts recommend and voila! I got the glow! Subtle enough for me to have to move my face to catch the light and make it visible but enough that I could see a difference in how my skin looked. A much later addition to the highlight game but again from Benefit was their cult classic High Beam; the same consistency just a more pinky pearl shimmer. A gift from the lovely Lipstick n Linguine's giveaway, I hadn't made this purchase before because I thought my skin tone needed a more champagne toned shimmer but the old High Beam, she goes alright. Same application, same points on my face and the shimmer is perfect for day and nighttime. I just make sure to apply the cream highlight after foundation and before powder because it won't sit well on top of powdered skin. You can also add a drop of the Benefit highlighters to your foundation for an all over glow but I haven't been game enough to try this for fear of turning out like a shining moon.

Once I'd dipped my toe in the proverbial highlighting pool, that was it! Dim Light from my beloved Hourglass Ambient Lighting Palette gets a lot of use but the middle and right hand shades- Incandescent Light and Radiant Light have been a little neglected. Until recently that is. Incandescent light has become my everyday brow highlight and my general face highlight for both day and evening looks because this palette is phenom. If you know these powders then you know they're designed with new technology to create even looking skin texture by reflecting light so therefore the way these make your skin glow is beautifully natural. The shimmer is super fine so there's no chunky particles and you're just left with very healthy, radiant looking skin. You may know this if you've read my past blogposts or seen my Instagram posts but for me, Hourglass can honestly do no wrong.

MAC's Porcelain Pink was in fact the first highlighter I ever purchased. It was quite a long time ago now, I just haven't really used it. I bought it at the Estee Lauder corporate store and at the time I swore I'd heard the name mentioned on YouTube but I think I was very wrong. Nothing wrong with this highlighter but I find it a little too pink for my skintone so I don't reach for it that often. I've used it on my friends and thought it looked gorgeous but just don't feel it on me. It's the standard formula for MAC highlighters so a very fine powder, easy to use and blend out. Usually products like this that don't get much use I'll giveaway but I keep challenging myself to use it and writing this post has reminded me so I'll be bringing it to the front of my cheek drawer!

Now that we've talked about things to put on your face to #getdaglow, there are a few things you can do for your skin to get it looking more radiant and at its best. Water! Drink a lot of it, all day everyday. Small sips throughout the day even if you aren't hungry and this will improve skin's clarity and complexion. Moisturise! I used to be one of the sinners who thought because their skin was more oily that I didn't need to moisturise as much/twice a day. Ba boooooooow- wrong. Your skin then tries to overcompensate and it just makes things worse (I might go more into this in a skincare post but not sure yet). By moisturising you help to balance your skin and it'll look more radiant and plump.

They're my two quick and easy tips for things you can do for yourself but if you just want a lil extra VS glam then go artificial and light yo'self up girl! What is your favourite highlighting product? Do you prefer cream or powder products?

Sunday, 17 August 2014

Liebster Award


I've seen this 'Liebster Award' post doing the rounds since I started my blog and never had a clue what it was about but now I've been tagged and caught onto the trend! So this is kind of blogger chainmail and it basically works like a normal tag except you answer the questions then create your own for the next lot of bloggers that you choose to tag.

So I was tagged by the lovely Jessie, check out her blog for all things beauty and more!  


Rules:
1. POST ELEVEN FACTS ABOUT YOURSELF.
2. ANSWER THE ELEVEN QUESTIONS PROVIDED BY THE PERSON WHO NOMINATED YOU AND THEN CREATE AN ELEVEN-QUESTION SET FOR THE NEXT GROUP OF NOMINEES. 
3. CHOOSE ELEVEN PEOPLE TO NOMINATE AND LINK THEM IN THE POST. 
4. LET YOUR NOMINEES KNOW THEY'VE BEEN TAGGED - AND NO TAG-BACKS! 
5. NOMINATE BLOGS UNDER 200 FOLLOWERS.


11 Facts About Me:

1. I never know what to say when people ask 'facts' about me or interesting things.
2. I finished my uni degree at the end of last year and now have to decide what I want to do with my life.
3. I'm working in retail to avoid joining the adult world. 
4. I love to travel. 
5. At some point (soonish?) I'd like to move overseas.
6. Brunch is my favourite.
7. I enjoy baking.
8. I always have a beauty/accessories wishlist as long as my arm.
9. I used to want to be a fashion designer/in the fashion industry.
10. I like to sew. 
11. I can speak ok French and a bit better than ok Italian. 


Jessie's Questions:

1. What's your favourite food?
I think either Italian or all the Asians (specifically Japanese & Vietnamese).

2. Where would you like to travel to?
Spain, Maldives, South East Asia, Netherlands and sooo many more. 

3. What's your favourite lipstick?
Noooope sorry. Too hard!

4. What's your makeup bag must-have?
I may be the only beauty obsessive that doesn't actually have a makeup bag but I do always carry around blotting papers and powder for a quick retouch.

5. How long have you been blogging for?
Still pretty fresh in the blogging game, only since January of this year. 

6. Naked face or naked nails?
Naked nails I think.

7. What's your favourite place to shop for beauty products?
Mecca Cosmetica/Maxima for sure! If overseas then of course the mothership- Sephora!

8. How can a person win your heart?
Good humour and kind heart. 

9. What's your favourite quote?
I'm not really a quote person but  I do have an Audrey Hepburn quote written on a mini whiteboard near where I get ready every morning- 
"For beautiful eyes, look for the good in others; for beautiful lips, speak only words of kindness; and for poise, walk with the knowledge that you are never alone."
10. What was the inspiration behind your blog name?
I originally was going to name it Beauty & Bits (catchy right..) so through brainstorming and saying names out aloud I somehow got to Beautylocale. 

11. If you could be any celebrity, who would you be?
Oh I don't know.. Ellen or Oprah maybe? They do a lot of good, make people happy and look like they enjoy what they do. 


The Eleven Beauties I Nominate-

Nicole - Nicolesbeautybabble
Dani- KaBOOMCosmetics
Rosa- LipsticknLinguine
Tahana Lee-TahanaLeeBeauty
Louise- TheBeautyVine
Dana- DarlingDeeDee
Sarah- BowsandPleats
Brittany- BrittersBlog
Jessica- TakenbySurprise
Jacquelyn- HeyThereJacquelyn
Bec- BeautyBloggingWithBec


My Questions:


1. What is your favourite thing about blogging?
2. Which part of your morning routine do you most dread doing?
3.Who do you look for for beauty inspiration?
4. Where are you from?
5. If you could live anywhere in the world, where and why?
6. Which high-end beauty product would you love most but can't justify?
7. Which beauty brand do you wish was available near you? (if you're not in Australia)
8. Which beauty product do you hoard/collect most?
9. Which beauty trend are you not game enough to try?
10. Which item can't you live without?
11. What makeup/beauty don't do you do?

Tuesday, 12 August 2014

The Luxury Face Mask


GlamGlow is a high-end face mask brand that gets quite a bit of hype on social media and YouTube but at quite a high price point, I was a little hesitant to take the plunge but then I had a yolo/feeling spendy moment and thought really, if this can improve my skin then it is worth the pennies! I bought  Super Mud months ago from MeccaCosmetica but it was one of those things that I didn't want to use  because it's an expensive product. Anyone else have that logic?! It's ridiculous I know, and it's why things can sometimes go to waste in my collection. (I'm working on it I swear!) Another reason I hadn't opened it yet was because I had so many masks already open and on the go so I didn't really want to add the collection hence I waited to finish a few of them.

not the most appealing looking product
GlamGlow's time to shine finally came last week and boy, did it shine! I came home from a long day at work and was feeling a mask so I double cleansed and removed all my makeup and opened the little pot of muddy goodness. For $70+ the size of the pot looks ridiculously small but they say you'll get 17 uses for full-face or over 100 uses as a spot treatment. From this I took the less is more approach and just put a thin layer all over my face; as I've seen in reviews and on YouTube it dries to a light grey on the majority of your face and in the spots that it's targeting more deeply it stays a darker colour. Hard to explain but if you've used it you'll probably understand or even if you've seen photos. I think it recommends to leave the mask on for 15-20 mins and I probably was closer to the 20-25 minute mark by the end, I just got a bit distracted. As it is a clay mask it dries quite stiff so don't put this on before you want to eat or have some serious discussions or laugh or really make any facial expression 'cos it won't be happening. I used a face washer (flannel) and warm water to remove it which was super easy and I could honestly see a big improvement in the redness of my breakouts and skin in general and once dried it felt super smooth. It calmed my skin but also brought some icky bits to the surface so improved overall clarity.

A couple of minutes after application

The next night (or night after) I used it as a spot treatment on my more deep/blind spots which I probably left on for 10-15mins and they definitely felt reduced afterwards. Since putting a photo up on Instagram I've been told that the Super Mud is no longer sold in Australia due to some ingredient that it contains.. slightly worrying but I guess it must just be Australian regulation because it's still readily available overseas and online if you're interested. If anyone knows more on that please feel free to inform me! Now that I'm convinced of it's magic I'm very eager to try more from GlamGlow especially Thirsty Mud and their newest addition, Power Mud- a dual cleanse treatment that turns to oil and is apparently great for heavy makeup users like myself who for the most part wears foundation on the daily. GlamGlow if you're listening (or MeccaCosmetica for that matter) please bring more of your range to Australia!


Sunday, 27 July 2014

The All Day Matte Lip | Bourjois Rouge Edition Velvet


The lip product hybrid seems to be all the craze in the beauty world! A while ago I did a post on lip lacquers which have also had their hype and craze in the beautysphere but now the liquid to matte lip seems to be a popular venture from so many beauty brands. Today we're focusing on Bourjois' Rouge Edition Velvet which I first saw on ViviannaDoesMakeup's YouTube channel/blog and she lurrrrrved them so naturally I took her recommendation as gospel and had my eye out for their launch in Australia. In the meantime I saw many more reviews, swatches and raves so of course my want was even greater. However when they finally landed here maybe two or so months ago now, they retailed for $24.95 each at Priceline which I know is kind of standard for lip products even at the drugstore but seeing as I was hoping to try a few shades the price kind of put me off initially. Fellow beauty instagrammers came to save the day and a gorgeous girl alerted me to Priceline offering these for $10! I hopped to it and picked up two shades to start off with- Hot Pepper and Ole Flamingo, both of which I'd researched and thought looked beautiful and luckily they were in stock!

Hot Pepper
I wore Hot Pepper to work and gave it the work girls test and I honestly had so many compliments and one of the girls even made me take her to Priceline and pick out a colour with her. The colour is beautiful, fades really nicely and doesn't go patchy and even though I talk all. day. at work these are super long lasting and I only reapplied after eating. On arrival back home as usual I took my base off with cleansing water and lips too which took a bit of a scrub to remove so that gives you more of an idea how long lasting these actually are!

I have also spotted these on ASOS for around $13 if you're interested in buying up quite a few (I know I am) After trying them they certainly are worth the hype and the full price because a beautiful matte lip that doesn't dry your lips or feel tight and uncomfortable in my book is worth your while! Absolutely no complaints from me.

Hot Pepper, Ole Flamingo (one swipe)


Sunday, 20 July 2014

The Latest | Chanel Perfection Lumiere Velvet

oooh a candle, how beauty blogger of me!

Oh Chanel, you makers of face base magic. The launch of their latest addition- Perfection Lumiere Velvet caused quite a stir in the beauty blogosphere and on YouTube. It could be because of it's chic and sleek packaging, that it makes a beautiful addition to photos let alone it's new type of formula- lightweight, matte but luminous and it's intended to blur and perfect skin's texture. This one is much more liquidy than my HG Mat Lumiere and therefore more lightweight in coverage and feeling on the skin. I visited my local Chanel counter and got a sample in the shade B30 because it was all they had and it was definitely too dark for my pale face but with a little buff and blend down the neck, you could barely tell. On immediate application the texture is sort of similar to that of L'Oreal's Nude Magique/Eau de Teint foundation- fairly liquidy and dries quickly therefore you need to work quite quickly. Coverage for me I would say is medium but definitely buildable, I do like to add a touch more to areas that have a bit more redness or hyper-pigmentation.

I used my tester sachet over two days and really liked it both days, got compliments on my skin and put it on my wishlist. I then went back to a counter a few weeks later and got another sample because I couldn't decide, first of all which shade to get and secondly, whether to try something new or repurchase my beloved Mat Lumiere that I'm coming dangerously close to finishing plus I've heard rumours of it being discontinued. On second visit to a different counter and department store I was recommended PLV and told that no, Mat Lumiere isn't being discontinued and they didn't know why I'd been told that. (Side note/rant: I swear to the makeup Gods if they were wrong about that I will be so unimpressed and annoyed that the staff at different department stores who are all under the Chanel brand are told different things and have misinformed me. Rant over..) The ladies recommended I go lighter than B20 which I have in ML and go for either B10 or B12 in PLV aka the lightest and second lightest shades. This is how pale I've become, serious first world problems but still. B12 had a slightly more pink undertone which she said would also make my skin appear brighter and kind of cancel out redness which I don't necessarily understand but I went with B12 because B10 looked too light and definitely too yellow-based. At $77 a bottle you do expect good things and now that I've been using it for a few weeks and have applied it in various ways I thought a blog post was in order.


Shade B12

Initially I went straight for the products I know best and I know work well for me so surprise surprise.. Hourglass Mineral Veil Primer was first pick together with the Real Techniques Buffing brush. I wore this to work, asked all my gal pals to analyse my face and they said what I was thinking.. it's ok but my skin/face base usually looks better. Unimpressed the next day I persevered and used Body Shop's Instablur as my base instead and we had improvements. I used my buffing brush again and I saw more of the skin blurring/perfecting qualities that Chanel talks about but still wasn't 100% with how it was sitting. Super disappointed seeing as I'd tried it twice, loved it then spent the money purchasing the full size. Anyway I gave it a rest for a few days and never fear I think I've found the answer! My faithful Hourglass primer does actually work well under this foundation as does the Body Shop Instablur together with the Real Techniques Stippling brush instead (which I prefer with L'Oreal Nude Magique as well) + last tip, as they do recommend- give the bottle a good shake up before you squeeze out your pea size amount. The Chanel site recommends using this foundation with your fingertips but I'm just not the hugest fan of doing that but now I understand why a buffing brush hasn't worked well with it. Lesson learnt! 

What they say:

PERFECTION LUMIÈRE VELVET is a lightweight second-skin foundation. It naturally smoothes and evens out the complexion for a velvety matte makeup result.

The lightweight texture of PLV makes it perfect for normal and combination to oily skin. This ultra-soft emulsion instantly becomes one with the skin, transforming into a natural powdery matte finish that disappears onto the skin.

Monday, 14 July 2014

The INGLOT Freedom Palettes


Something that is definitely not a rarity in the makeup world are eyeshadow palettes. Every company from low to high end have at least one palette to offer so it can make it difficult choosing one if you're not wanting to shell out lots of money trying different brands' offerings. This is why I like the idea of putting my own palette together and of course MAC is probably most famous for this option as a makeup artist's staple. However, here we have another company that does a similar thing- INGLOT.

INGLOT has the Freedom system which lets you put together eyeshadows, blush, lipstick, brow powders and more! I'd heard and read great things about their eyeshadows and I wanted to try them out so I put together my first palette when I was on holiday in Italy last year. It was slightly cheaper than it is in Australia but the prices here are incredible for the quality of the shadows. Here they retail for $10 per shadow which comes in a magnetised pan so you can choose however many you'd like to put together. For my first palette I went with a 5 pan as I was travelling so I didn't what anything too bulky. The lovely assistant helped me choose some colours that would be flattering for my eye colour but I knew I wanted a cranberry and navy shade. I then went with some neutrals that I knew I would get a lot of wear out of and I was not disappointed at all! The palettes themselves are magnetic so the lid clicks on and off and the eyeshadows slot in easily so it's all ready to go when you buy it. Completely chuffed with my first palette I couldn't help but visit the stand at Bondi Junction Westfield to expand my collection.. 

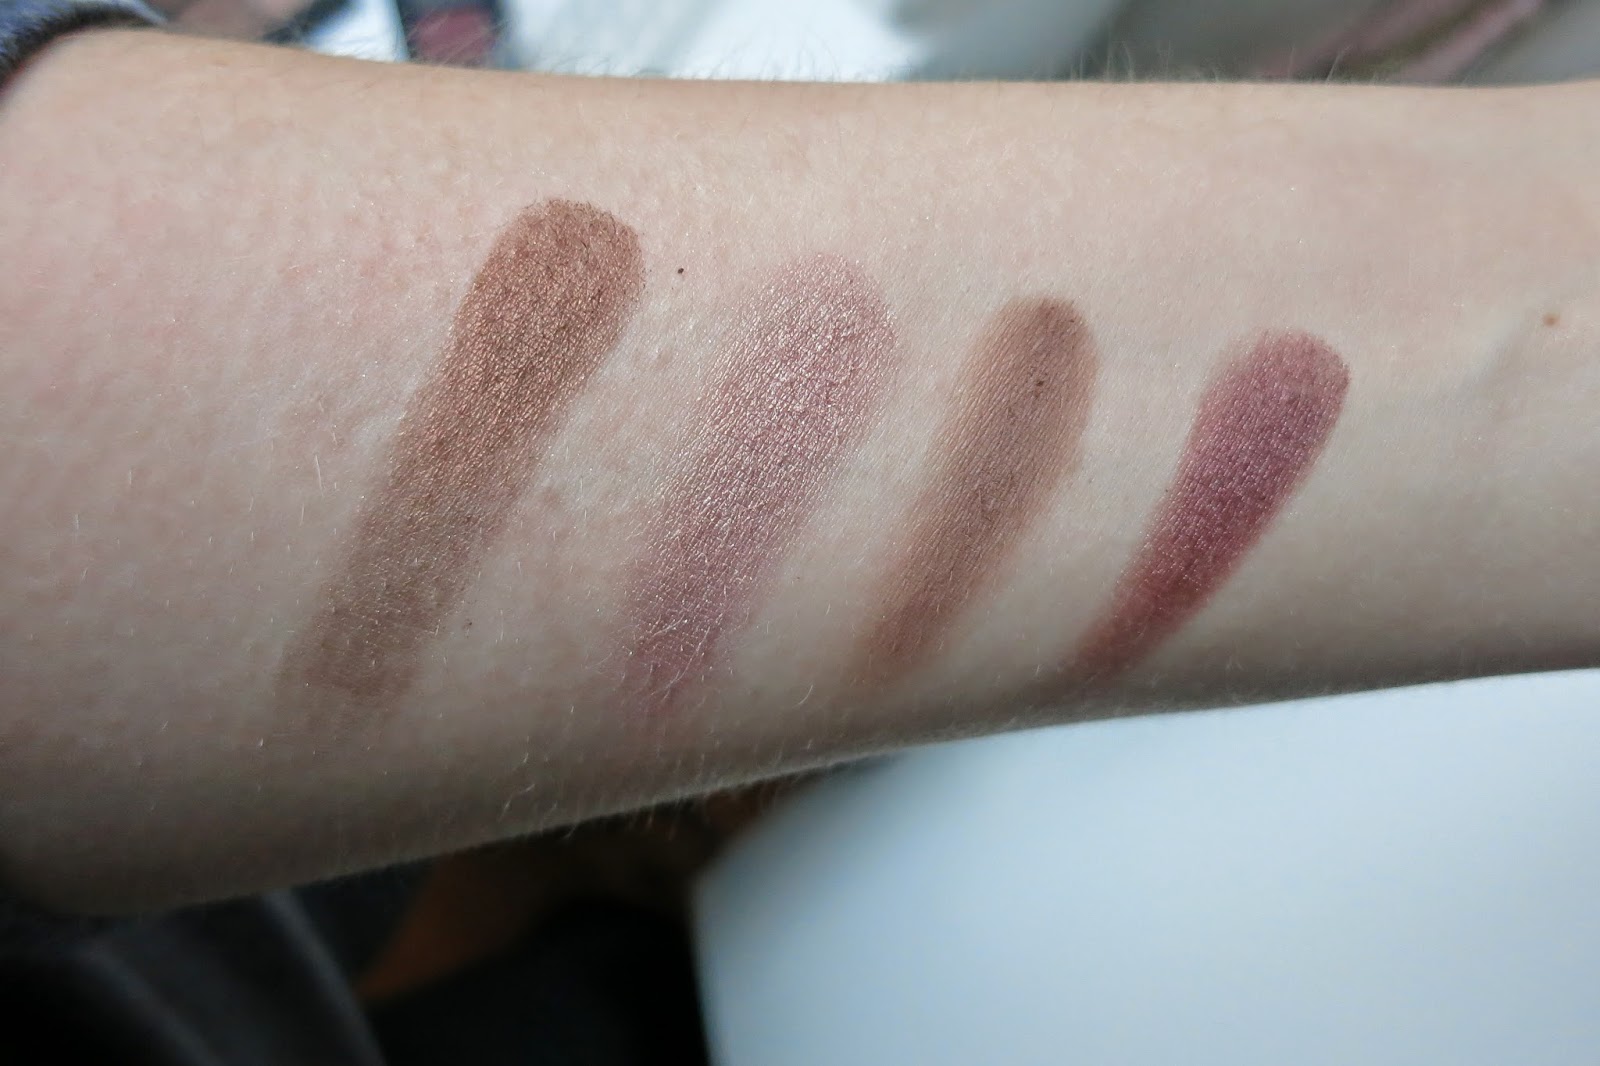
#21, #31, #357, #452

My intention with the quad was something that I could throw in my bag if I ever needed to do my makeup on the go and have colours that I could use for everyday and carry into the evening. Of course they're all neutrals, right up my alley and I've used it a heck of a lot since I bought it at the end of last year. In both palettes I've got a mix of matte and shimmer shades and I'm not disappointed by any of them. The mattes are buttery and opaque, not horrible and chalky and the shimmer shades are beautiful with the perfect amount of shimmer. Whenever I wear these I always get compliments on how they look and paired together with my Urban Decay Primer Potion these last all day. No issues with creasing or wearing off I just love 'em! The quality of these have been compared to that of MAC and other high end options that are much more pricey than these and I definitely agree. You can also purchase from their website if there's no store near you because unfortunately they're a bit few and far between here in Australia.

My Quad- Brown shimmer - #21, Pinky shimmer- #31, Matte brown- #357, Matte nude- #328
Five Palette- Tri Nudes- #101R, Champagne shimmer- #154, Matte grey- #348, Burgundy shimmer- #452, Navy shimmer- #61
Follow on Bloglovin