Wednesday, 28 May 2014

Haircare Routine from Wet to Dry


I'm not one to put a lot of time and effort into my hair and it's only recently that I've started doing more regular treatments to try and restore my dry ends. In saying that though, there are a few products that I do run through my hair after I've washed it (so 2-3 times a week) but other than that I just spritz some heat protectant in everyday before straightening to taming the front frizzies.

I have quite thick, wavy hair and it is also a bit frizzy but much less than it used to be when I was younger. I've used MorrocanOil religiously for probably over 2 years now and it's been the only product I've really used together with heat protectant because I've always been quite weary about further damaging my hair. These days I've started incorporating more into my haircare routine from wet to dry so here's a bit of a rundown of what I'm currently using. 

From towel dried to blow dry I always start with either a pea size of MorrocanOil or more recently L'Oreal Ever Sleek serum or even both. Both of these are great for taming frizz and overall smoothing but I feel the MorrocanOil does a bit more for treating and repairing my hair whereas L'Oreal is more for just sleeking everything down. I then move onto drying my hair which I am far from professional at and generally I just dry my hair using a Tangle Teezer or my hands to pull the hair taught so it dries more straight. Before starting this I spritz Tresemme Keratin Smooth Heat Protectant all over my hair, comb through with my fingers and give it a few minutes to sink in. Then on a low-medium heat I dry my hair as best as I can and just do about 3/4  (because there is a lot of it) and just let the rest air dry. I then clip my hair into a loose bun to kind of smooth it down and make it less fluffy, I'll keep getting ready for a few minutes then go back to straighten the front bits around the edge of my face. I don't like to straighten immediately after drying because I feel like that's a lot of intense heat on my hair in one go so I do like to leave my hair to cool down for a little bit. Once I've completely finished and straightened what I want to fix up I like to use a pea size drop of Bumble & Bumble's Invisible Oil all over, starting from the ends to further tame frizz and smooth everything down. If my ends are feeling particularly dry I'll add a tiny amount of John Freida's Frizz Ease Finishing Creme just to the ends avoiding the roots completely because this is quite a heavy product. 

So there we have a brief rundown of my wet to dry haircare routine and the products I reach for once I've washed my hair. Products I use for styling and curling is separate to the products I've mentioned, these are just for haircare and making everything look a bit more sleek and smooth! 

Sunday, 25 May 2014

Winter Skin Saviours


With winter creeping up on us there are a few products that I like to have on hand to avoid things getting dry and all sorts of unappealing. Dry skin and chapped lips are probably one of the most dreaded things about Winter for me so with the help of these few bits I plan on avoiding it as much as I can! It's all about the prep and maintenance in my books so here's what I keep on hand for the chillier months.

Moisturise and repeat! The key in Winter for body, face and hair so for this I turn to Aesop's Body Balm for a fabulous all over moisturiser that smells amazing, absorbs quickly and moisturises deeply. A bedside table essential is L'Occitane's Dry Skin Hand Cream which I find a bit too thick for during the day but perfect for overnight. If things are looking quite dehydrated, try putting some cotton gloves on once you've moisturised to let it sink in even deeper and work twice as hard while you sleep. For super dry patches on my face or body I turn to Vitamin E cream, a fantastic natural option and a multitasking product which I use for dry patches around my nose when I'm sick, on my elbows and just anywhere that needs a surge of moisture. 

A newish duo to the routine is a match made in heaven from Kiehl's- their Midnight Recovery Concentrate and Ultra Facial Cream. If you follow me on Instagram you would've already read my praise for these two but together they have made such a difference to my skin in recent weeks. As a gal with combination skin I've always been a bit weary of using heavy moisturisers especially for the daytime but my skin has just been calling for it but even though this is quite a thick and intense moisturiser I've been wearing it during the day under foundation and it hasn't mixed badly with my makeup at all. Long term I don't think ill use this day and night but it was just what the doctor ordered in the past few weeks and I will continue to use it together with the Midnight Concentrate in my evening routine. 

Last but not least, how could I discuss my skin saviours and not mention Lush Lip Scrubs! Whatever season this stuff is the bomb.com and I really don't know what I did before I used this. I've gone through one pot in no time and I now keep it on my bathroom shelf to remind myself to use it more regularly. Perfect prep for a bold lip and just smoothing out your lips in general really. 

I'm now feeling skincare prepared for the chilly months ahead and hopefully things won't go scaly and icky. (Mmm what a lovely visual!) 

Tuesday, 20 May 2014

High End Worth Their Buck


I'm not one for only buying highend makeup or drugstore makeup, I much prefer to have a mix and be more well rounded in my makeup knowledge and products and plus I really don't see the point in spending at least double the amount of money on a product when there is an equivalent or an even better 'drugstore' alternative. Many products out there have affordable alternatives but the so called dupes might not match their high end competitor in standard and quality. Therefore there are a few products that I am willing to shell out the extra few pennies to get a bit better quality (in theory) and here are a few...

Chanel Mat Lumiere- I've raved about this enough on my blog but this is my everyday go-to foundation and the closest I think I've ever come to a Holy Grail base product. I've tried many drugstore and highend foundations but nothing has pleased me enough to reach for it everyday for a long period of time. My Lumiere in B20 is a perfect match for me, great medium coverage for everyday and doesn't leave my skin feeling heavy or cakey. It lasts really well on my combination skin and most of the time I don't even bother touching up or powdering especially now that it's cooler weather, my makeup isn't sliding around in the heat.

Hourglass Mineral Veil Primer- again a product I've talked your ear off about so I won't say much but if you're in Australia, have a Mecca Cosmetica counter near you, have combination skin and are looking for an all round primer; go and ask for a sample. This purchase made me wince handing over my card to pay but I haven't regretted it a day since. I use it everyday regardless of whether I'm going out or to work, it makes my make up last for hours, controls oil and has light diffusing qualities making your face look closer to flawless and even textured. Who doesn't want that?! 

MAC Eyeshadows- my 15 pan palette has one lonely spot waiting to be filled but I'm waiting to find that shade that I must have to take my eye. MAC shadows get lots of rave and review because really, the quality is that good. I have a mix of matte and shimmer shades, none of which I've ever found chalky or patchy, they're smooth to apply and the pigmentation is always there. Even their black (Carbon) is proper black not like grey/black that a lot of matte black shades can be. The brand speaks for itself really and they have a reputation for a reason. I'm no MAC devotee but ill spend the extra dollar on their eyeshadows and lipsticks because the quality is worth the price point. 

NARS blushes- Now I only have two shades in their blush range but again, like MAC these blushes get the hype for a reason. The shade range has a great variety of matte and shimmer blushes and shades to suit all skin tones. The pigmentation is phenomenal to the point where the lightest of hands is necessary to not overdo things. So in doing that these pretty little blush pans will last you a very long time which makes spending that bit extra worth it I think. The blushes blend beautifully, are super soft and buttery and have great lasting power on the skin. 

MAC lipstick- As I mentioned before there are only a few MAC products that I will pay Australian prices for and their lipsticks just make it into that category. I still don't enjoy paying the $36 but the formulas (plural because you have such a diverse range at MAC) are really worth it and of course their infamous shade range displayed on the tiered shelves gets me every time. My favourite of their formulas are the matte and creamsheen ranges- matte because they're super long lasting without being overly drying and creamsheen because they have just the right amount of moisture and sheen look to them which makes it a great formula for those everyday shades. 

Hourglass Ambient Lighting Powder + Blushes- the launch of the Lighting Powder Trio palette had many a makeup maven in a tither, myself included. The day these launched at Mecca I had mine put aside to make sure I wouldn't miss out and boy am I glad I did. At $60 each for the single powders, paying just over $100 for the palette seemed like an amazing deal to me! Plus one of the shades was limited edition if I'm not mistaken but I mainly bought it for Dim Light which blurs imperfections and has light diffusing technology to make everything seem beautiful and airbrushed. The beauty of makeup I tells ya! After my success with their powders, the rumours of a blush line had me equally as excited. Teasers on instagram of the shade range showed that they are quite a unique blush with colour and a more neutral tone marbled together to create a blushing beauty. From what I've seen, these have received mixed reviews but personally I'm a big fan. Coming in at $50 at Mecca Cosmetica they're a pretty similar to that of NARS and other high end brands but to be honest I was pleasantly surprised with that, I was definitely expecting a higher price point. At the moment I just have the shade Dim Infusion which is a beautiful coral but I've got my eye on Mood Exposure for the Winter time.

This is my brief roundup of highend products that I love and use if not on the daily then super regularly. There are lots more products that I've spent the extra money on and I've loved and many that I haven't loved but these bits will be in my collection for the foreseeable future.. sorry bank account. 

Review | Maybelline Colour Elixirs


If you follow me on Instagram you'll already know I was pretty excited when these hit our shelves in recent weeks! After reading/seeing all the raves from the Northern Hemisphere beauties, namely Estee (essiebutton) who raaaaved about these and what Estee says, goes. I generally like her recommendations and trust them which really seems a bit strange to trust a complete stranger's opinions on products but whatever trevor.

These popped up in Priceline last week and they've been priced at $17.95 RRP but they had a $4 off lips deal when I bought these so I saved a few pretty pennies. I had a few minutes to spare on my way to work this said morning so I made my way to Priceline and there they stood in all their glory. This same week Bourjois launched their Rouge Edition Velvet which I'd seen on my Instagram feed and already they'd received mixed reviews and at $24.95 I wasn't overly impressed with that. Anna, of Vivianna Does Makeup, another blogger who I trust with my makeup spendings absolutely loves the Bourjois offering but I'm definitely going to wait for some kind of offer on them. In my mind I can't justify that much for a drugstore product regardless of how good it is. Anyway! Back to Maybelline.. So I stood at the stand doin' my swatches and found myself commenting on how pretty they were. out loud. in public. Didn't even realise I was doing it but luckily it was early morning so only a few other people were in the store. After swatching all the shades and ooohing and aahhhing I restrained myself to just two shades for the time being, I wanted to see how they actually went on the lips before shopping up a storm.


The low down:
I bought Caramel Infused and Raspberry Rhapsody, both super wearable for everyday and great for the  cooler months cos y'all know I like my deep lip shades if you've read my Autumn/Winter trends post. These wear beautifully on the lips, aren't overly sticky or tacky and you can build up the colour or have it as more of a sheer wash. They are lightly fragranced and it took me a few wears to realise what it was but to me it seriously smells like Armani Code perfume which I love so it doesn't bother me.

I'm loving these at the moment especially with their Dior-esque packaging of the acrylic with a lipstick outline inside- super cute and high end looking!

Caramel Infused, Raspberry Rhapsody

Wednesday, 14 May 2014

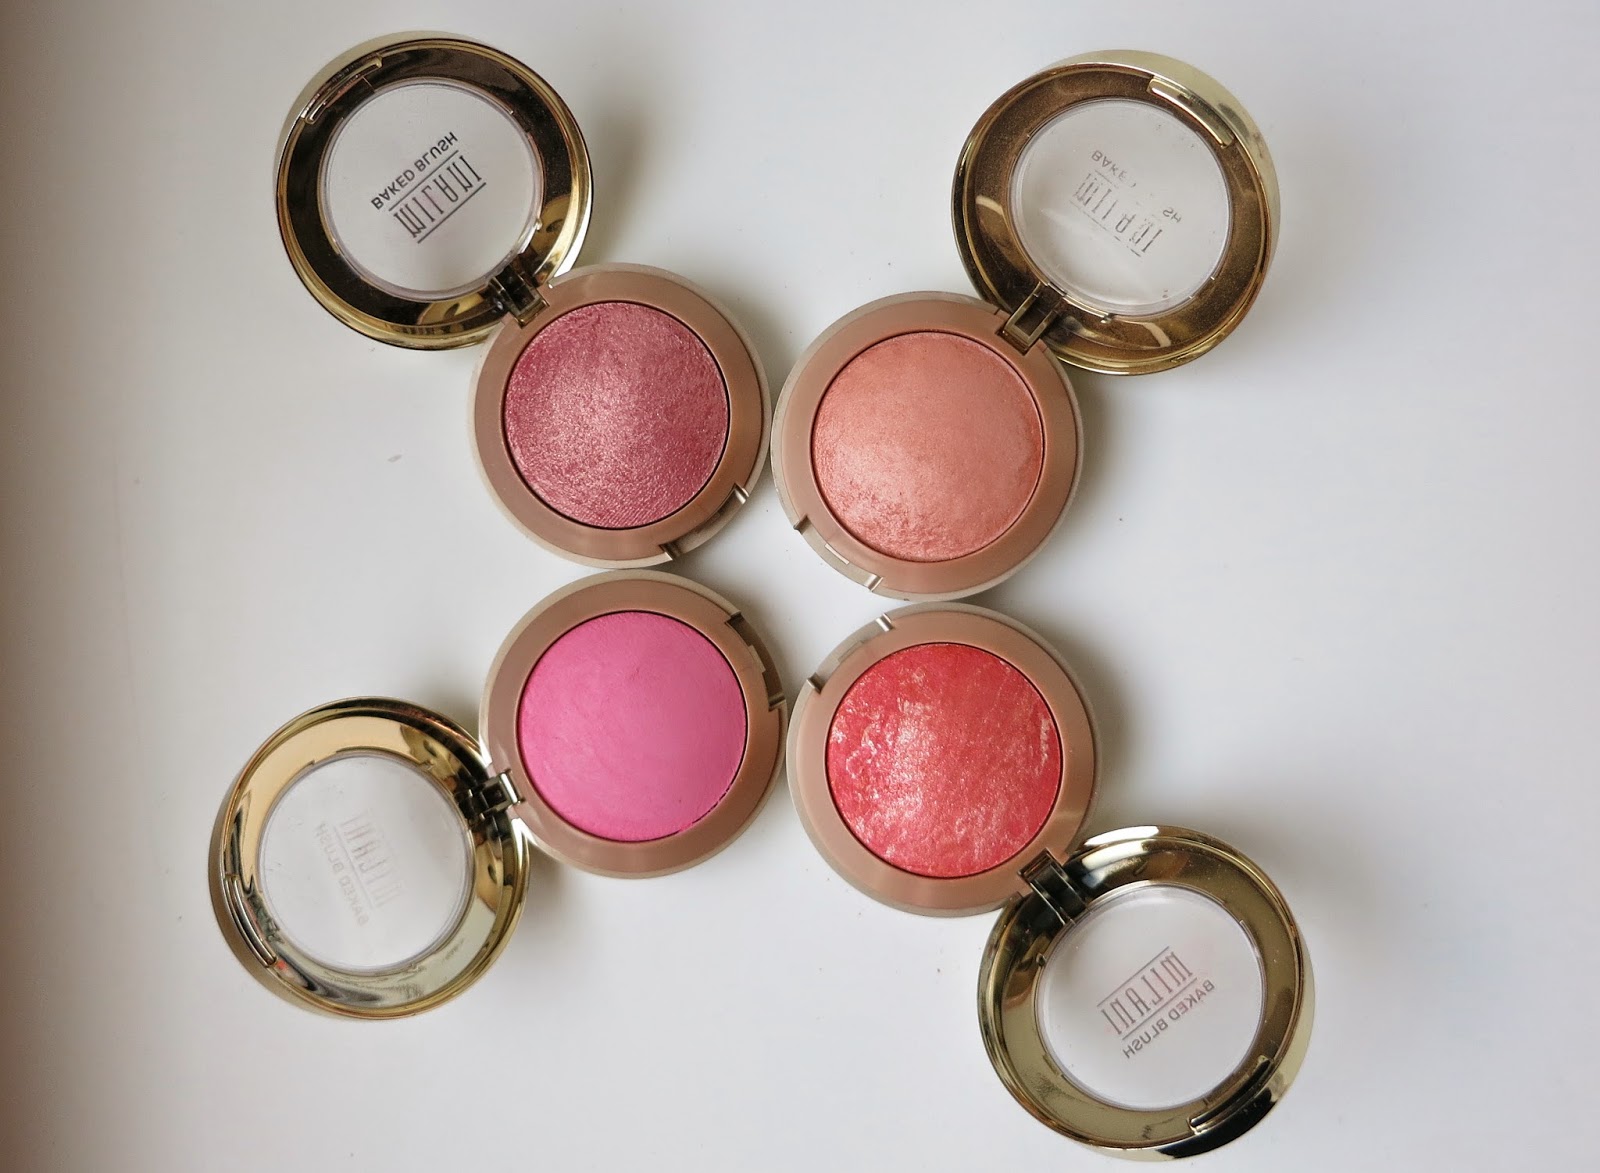
Review | Milani Baked Blushes


I've been a big fan of the Milani baked blushes for a while now and with the recent addition of two more beautiful shades, I thought a blog post was in order! I've tried a few other bits from Milani but they're baked blushes are spot on and the hype they receive is well deserved. At around $8 online from Cherry Culture or Beauty Bay they're an absolute bargain buy for us Aussies who are accustom to paying a lot more than this for 'drugstore' products.

My first purchase was Luminoso, definitely influenced by the many beauty ladies on YouTube who absolutely raved about this shade and it's been dubbed a dupe for NARS Orgasm, a cult favourite that I personally have never been lured to due to its shimmer but strangely enough I love Luminoso. I'm not the hugest fan of shimmer in blush because it can highlight any textural issues on the cheeks (which I do have) so generally I try to avoid it. The shimmer in Luminoso is quite subtle on the cheeks and just gives more of a glow than a disco ball shimmer effect. These blushes are beautifully pigmented and buttery smooth to apply; they're definitely buildable so use a light hand especially with the brighter shades to avoid looking overly blushed. Like they say, less is more!

Recent additions to the baked blush collection were Dolce Pink and Delizioso Pink which both swatch beautifully and I'm looking forward to putting them to good use. Luminoso is definitely one of my go-to blushes, especially when in doubt because it gives such a beautiful healthy glow to the cheeks.

Delizoso Pink,  Corallina, Dolce Pink, Luminoso
These are a great choice for a drugstore blush, affordable and amazing quality and pretty easy for us Australian makeup mavens to get our hands on through a few online stores. I definitely recommend these and I may just have to expand my collection in the future..


Sunday, 11 May 2014

The Trends| Autumn/Winter 2014


According to an article I read on UK Vogue's website, bold lips are out for Autumn/Winter trends and it's all about focus on the eyes. L'Oreal's most recent campaign seems to suggest it's all about the 'winged eye' in its various forms which was definitely seen on the runways. I think I'll take this with a grain of salt because one of my favourite things about Autumn/Winter time is darker shades especially when it comes to lip colours so pish posh makeup trend experts, I'm gonna do what i want! (Sorry makeup Gods..)

Here are a few of my favourite picks of darker shades for eyes and lips, no surprise they're mostly dark red or plummy shades because I'm a bit generic like that.

If we're following the trend, for a winged eye I can't go past my Rimmel Glam Eyes liquid eyeliner which has a really fine, flexible nib so it makes it easy to create a tidy flick and gives you more control. I find the formula to be really long lasting as well which is a bonus. Otherwise if I'm feeling gel liner I like the Maybelline Eyestudio Gel liner which I find best to use with the little brush that it comes with and you can create quite a precise wing.

I did my friend's makeup the other week for an evening out on the town and I asked her what she wanted or had in mind and she said purple and I said what about red or like a beautiful burgundy colour.. She just looked at me and straight out said "Mmm..No." Even with some enticing phrases like "rusty red" and "it'll be beautiful I promise!" thrown around she still wasn't keen. In the end she put her face in my hands and it turned out beautifully and she loved it. (I did a post of it) It's just a matter of using red tones in the right way and the right amount, because yes as an all over lid shade there is the possibility of looking like you have a severe illness but blended with complimentary shades it's a beauty! In order to achieve a flattering eye look with red based tones, I look to MAC's Cranberry, Swiss Chocolate with a bit of Woodwinked thrown in. I also have a beautiful burgundy shade by Inglot (#452) which as I've mentioned before is amazing quality and a super flattering shade. I'm not going to sit here and rattle off every shade that I have in my collection that is suitable for Autumn/Winter and is reddish but a few other bits are the bargain buy from L'Oreal- their Colour Infallible range which is a sort of pressed pigment but I'm specifically talking about the shade Burning Black, she's a beaut! In terms of bases, my picks are Benefit's Creaseless Cream Shadow in R.S.V.P- a beautiful dusty pink which pinks up red tones like a dream and then MUFE's Aqua Cream in shade 17- a stunning maroon colour.

Blushes for me in the cooler months turn more plummy so my top picks are NARS Sin- a cult classic, MAC Harmony which is also great for contouring and a more affordable alternative is NYX Dusty Rose. 

Like eyes, if I sat here and listed every single lip product that is seasonally appropriate I would not only bore the hell out of anyone reading this but my fingers would also probably fall off from typing. So let's try and narrow this down to top 5.. I said try. I haven't even delved into my stash yet so let's see what shall emerge. Ok so I got top 6 and they're not necessarily my favourites but definitely some of my larger group of go-tos. You can't hate a girl for not discriminating! I've pulled out MAC Craving and Diva, Rimmel Moisture Renew in Sloane's Plum, Wet n Wild Ravin' Raisin and finally Revlon Matte Balm in Standout and Lacquer Balm in Flirtatious. Honourable mention goes to Rimmel Kate Moss in #107, Maybelline Yummy Plummy and MAC Rebel.

I feel like this post is just a bit of a list of some random products but I promise it does all come together nicely and makes for a nice wintery face!


Wednesday, 7 May 2014

How To | Cleaning Your Makeup Brushes

The one thing that a lot of beauties dread most would have the be.. the deep clean. Deep cleaning your brushes is super important but it's boring, time consuming and makes your hands pruney. I generally like to aim for every 2-3 weeks and more regularly for my main foundation brushes if I have the time just because the bacteria and build up of makeup creeps me out and I don't need any more excuses for my skin to misbehave! I alternate between my foundation brushes throughout the week and then if I'm super good I'll try wash them weekly or week and a half-ly. (If I'm good, being key..)

People do this whole process a bunch of different ways but I've always stuck to baby shampoo of any brand or any kind of gentle shampoo would do the job and of course specific brush cleaners are a popular choice as well. For years I've used baby shampoo but recently I bought a new product which I put to use last night and OH MA GAWD life. changing. I know this seems trivial and bla bla but for something like brush cleaning, I'll take whatever I can get to help me fasten the process. This product sent from the angels is the Beauty Blender Solid Cleanser! This little round pot of magic made cleaning my heap of brushes speedier, easier and my hands didn't get as pruney!

A few simple bits and a some time is all you need for this. (To do all these brushes probably took me around 40-45 mins)


1. Take your heap of brushes to the sink and get some flannels ready to lay everything down once they're washed.

2. Put some music on so you can have a dance/sing sesh while you wash to pass the time, cos girl you goin' be here a while.

3. I like to do my face brushes first then my eye brushes so gather your face brushes and just stare at the huge job that's in front of you..

4. Soldier on sista! It's super important to hold your brushes under the tap downwards so that the water doesn't run into the handle of the brush and get into the glue which overtime will lead to the hairs shedding and your brushes falling apart, so be cautious!

5. After running your brushes under warm water for a sec or two, take your cleaner of choice (BB solid cleanser pictured) and swirl your brush around until it lathers. If shampoo is your product of choice, pop a pea size into your palm and do the same- just swirl your brush around until it lathers up and the soap turns a lovely shade of foundation.

6. Repeat until the brush looks clean and/or the soap doesn't change colour (aka stays white) and it runs clear. Make sure you squeeze all the soap out (if more product comes out, then repeat) Rinse the brush to make sure all the soap is out completely .

7. For face brushes I swirl them on a flannel before I stand them to dry just to make sure there's no excess water. Again, standing your brushes up to dry avoids water heading into the handle of the brush and weakening it.

Eye brushes I do a little differently, don't ask me why because I have no answer but I've just always done it this way. So instead of using just soap, I first pour some olive oil onto a paper towel and then swirl each brush in the olive oil until majority of the product is off the brush. Then I give them a quick run under water and swirl in either the shampoo or solid cleanser and voila, eye brushes are done!


Before I lay the brushes down, any of the fluffy eye brushes or even fluffier face brushes like my Sigma  and Real Techniques contour brushes and Setting brushes, I cover in a brush guard to maintain the shape of the bristles. When you pay so much for brushes (I'm looking at you MAC 217) the difference a brush guard makes for drying is huge and it's well worth the effort to maintain it for longer. I bought a pack off eBay for under $2 which came with varied sizes, best $2 i ever spent!


Overall this looks like a lengthy process but it's not especially if you have some music going and entertain yourself while you do it! Cleaning your brushes properly is super important so that you're not spreading bacteria over your face everyday from built-up makeup in your brush as well as anything that latches on while your brushes are sitting on your vanity or wherever you store them.

The Beauty Blender Solid Cleanser  ($16US) made my brush cleaning a serious dream. Brushes that I found more difficult to clean -ahem Real Techniques Buffing brush- were so much easier with the solid cleanser and really dense brushes that I could never get 100% clean with shampoo and my palm just rinsed out the product. I was literally standing at my sink astounded by the amount of product coming off the brush from the quickest swirl of cleaner. Super impressed and now I think I'll look forward to cleaning my brushes slightly more. I definitely recommend the small investment to save you time and your hands!


Follow on Bloglovin