Sunday, 27 July 2014

The All Day Matte Lip | Bourjois Rouge Edition Velvet


The lip product hybrid seems to be all the craze in the beauty world! A while ago I did a post on lip lacquers which have also had their hype and craze in the beautysphere but now the liquid to matte lip seems to be a popular venture from so many beauty brands. Today we're focusing on Bourjois' Rouge Edition Velvet which I first saw on ViviannaDoesMakeup's YouTube channel/blog and she lurrrrrved them so naturally I took her recommendation as gospel and had my eye out for their launch in Australia. In the meantime I saw many more reviews, swatches and raves so of course my want was even greater. However when they finally landed here maybe two or so months ago now, they retailed for $24.95 each at Priceline which I know is kind of standard for lip products even at the drugstore but seeing as I was hoping to try a few shades the price kind of put me off initially. Fellow beauty instagrammers came to save the day and a gorgeous girl alerted me to Priceline offering these for $10! I hopped to it and picked up two shades to start off with- Hot Pepper and Ole Flamingo, both of which I'd researched and thought looked beautiful and luckily they were in stock!

Hot Pepper
I wore Hot Pepper to work and gave it the work girls test and I honestly had so many compliments and one of the girls even made me take her to Priceline and pick out a colour with her. The colour is beautiful, fades really nicely and doesn't go patchy and even though I talk all. day. at work these are super long lasting and I only reapplied after eating. On arrival back home as usual I took my base off with cleansing water and lips too which took a bit of a scrub to remove so that gives you more of an idea how long lasting these actually are!

I have also spotted these on ASOS for around $13 if you're interested in buying up quite a few (I know I am) After trying them they certainly are worth the hype and the full price because a beautiful matte lip that doesn't dry your lips or feel tight and uncomfortable in my book is worth your while! Absolutely no complaints from me.

Hot Pepper, Ole Flamingo (one swipe)


Sunday, 20 July 2014

The Latest | Chanel Perfection Lumiere Velvet

oooh a candle, how beauty blogger of me!

Oh Chanel, you makers of face base magic. The launch of their latest addition- Perfection Lumiere Velvet caused quite a stir in the beauty blogosphere and on YouTube. It could be because of it's chic and sleek packaging, that it makes a beautiful addition to photos let alone it's new type of formula- lightweight, matte but luminous and it's intended to blur and perfect skin's texture. This one is much more liquidy than my HG Mat Lumiere and therefore more lightweight in coverage and feeling on the skin. I visited my local Chanel counter and got a sample in the shade B30 because it was all they had and it was definitely too dark for my pale face but with a little buff and blend down the neck, you could barely tell. On immediate application the texture is sort of similar to that of L'Oreal's Nude Magique/Eau de Teint foundation- fairly liquidy and dries quickly therefore you need to work quite quickly. Coverage for me I would say is medium but definitely buildable, I do like to add a touch more to areas that have a bit more redness or hyper-pigmentation.

I used my tester sachet over two days and really liked it both days, got compliments on my skin and put it on my wishlist. I then went back to a counter a few weeks later and got another sample because I couldn't decide, first of all which shade to get and secondly, whether to try something new or repurchase my beloved Mat Lumiere that I'm coming dangerously close to finishing plus I've heard rumours of it being discontinued. On second visit to a different counter and department store I was recommended PLV and told that no, Mat Lumiere isn't being discontinued and they didn't know why I'd been told that. (Side note/rant: I swear to the makeup Gods if they were wrong about that I will be so unimpressed and annoyed that the staff at different department stores who are all under the Chanel brand are told different things and have misinformed me. Rant over..) The ladies recommended I go lighter than B20 which I have in ML and go for either B10 or B12 in PLV aka the lightest and second lightest shades. This is how pale I've become, serious first world problems but still. B12 had a slightly more pink undertone which she said would also make my skin appear brighter and kind of cancel out redness which I don't necessarily understand but I went with B12 because B10 looked too light and definitely too yellow-based. At $77 a bottle you do expect good things and now that I've been using it for a few weeks and have applied it in various ways I thought a blog post was in order.


Shade B12

Initially I went straight for the products I know best and I know work well for me so surprise surprise.. Hourglass Mineral Veil Primer was first pick together with the Real Techniques Buffing brush. I wore this to work, asked all my gal pals to analyse my face and they said what I was thinking.. it's ok but my skin/face base usually looks better. Unimpressed the next day I persevered and used Body Shop's Instablur as my base instead and we had improvements. I used my buffing brush again and I saw more of the skin blurring/perfecting qualities that Chanel talks about but still wasn't 100% with how it was sitting. Super disappointed seeing as I'd tried it twice, loved it then spent the money purchasing the full size. Anyway I gave it a rest for a few days and never fear I think I've found the answer! My faithful Hourglass primer does actually work well under this foundation as does the Body Shop Instablur together with the Real Techniques Stippling brush instead (which I prefer with L'Oreal Nude Magique as well) + last tip, as they do recommend- give the bottle a good shake up before you squeeze out your pea size amount. The Chanel site recommends using this foundation with your fingertips but I'm just not the hugest fan of doing that but now I understand why a buffing brush hasn't worked well with it. Lesson learnt! 

What they say:

PERFECTION LUMIÈRE VELVET is a lightweight second-skin foundation. It naturally smoothes and evens out the complexion for a velvety matte makeup result.

The lightweight texture of PLV makes it perfect for normal and combination to oily skin. This ultra-soft emulsion instantly becomes one with the skin, transforming into a natural powdery matte finish that disappears onto the skin.

Monday, 14 July 2014

The INGLOT Freedom Palettes


Something that is definitely not a rarity in the makeup world are eyeshadow palettes. Every company from low to high end have at least one palette to offer so it can make it difficult choosing one if you're not wanting to shell out lots of money trying different brands' offerings. This is why I like the idea of putting my own palette together and of course MAC is probably most famous for this option as a makeup artist's staple. However, here we have another company that does a similar thing- INGLOT.

INGLOT has the Freedom system which lets you put together eyeshadows, blush, lipstick, brow powders and more! I'd heard and read great things about their eyeshadows and I wanted to try them out so I put together my first palette when I was on holiday in Italy last year. It was slightly cheaper than it is in Australia but the prices here are incredible for the quality of the shadows. Here they retail for $10 per shadow which comes in a magnetised pan so you can choose however many you'd like to put together. For my first palette I went with a 5 pan as I was travelling so I didn't what anything too bulky. The lovely assistant helped me choose some colours that would be flattering for my eye colour but I knew I wanted a cranberry and navy shade. I then went with some neutrals that I knew I would get a lot of wear out of and I was not disappointed at all! The palettes themselves are magnetic so the lid clicks on and off and the eyeshadows slot in easily so it's all ready to go when you buy it. Completely chuffed with my first palette I couldn't help but visit the stand at Bondi Junction Westfield to expand my collection.. 

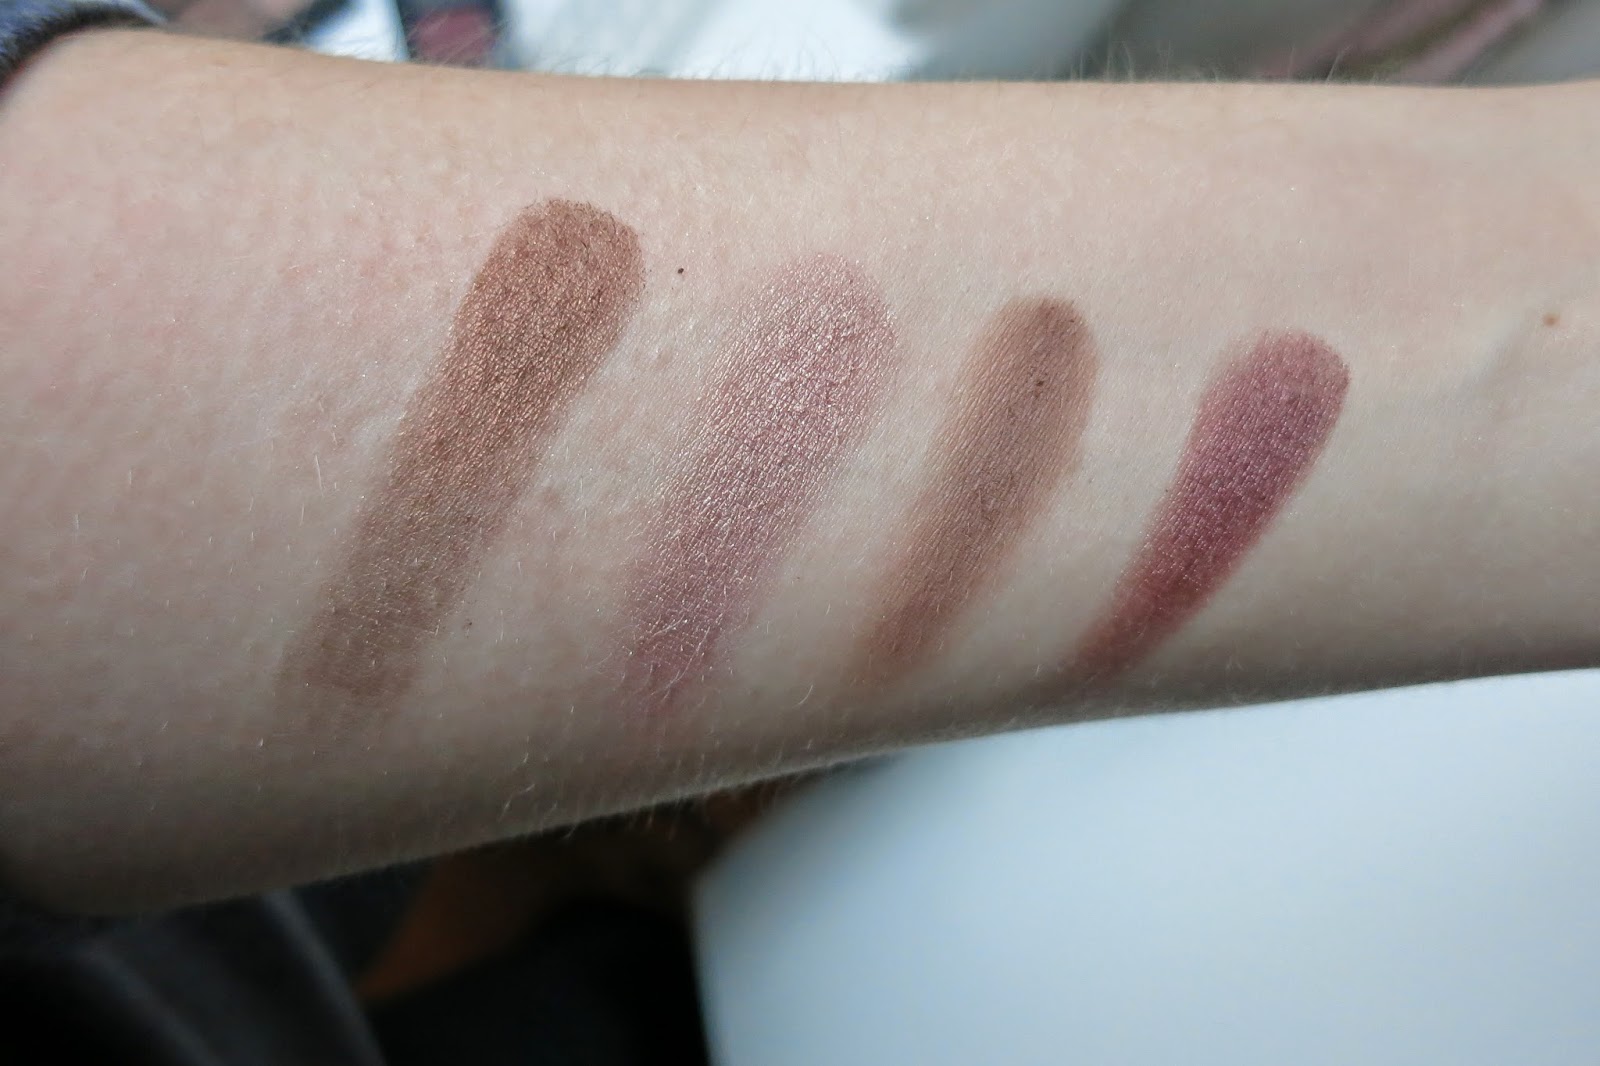
#21, #31, #357, #452

My intention with the quad was something that I could throw in my bag if I ever needed to do my makeup on the go and have colours that I could use for everyday and carry into the evening. Of course they're all neutrals, right up my alley and I've used it a heck of a lot since I bought it at the end of last year. In both palettes I've got a mix of matte and shimmer shades and I'm not disappointed by any of them. The mattes are buttery and opaque, not horrible and chalky and the shimmer shades are beautiful with the perfect amount of shimmer. Whenever I wear these I always get compliments on how they look and paired together with my Urban Decay Primer Potion these last all day. No issues with creasing or wearing off I just love 'em! The quality of these have been compared to that of MAC and other high end options that are much more pricey than these and I definitely agree. You can also purchase from their website if there's no store near you because unfortunately they're a bit few and far between here in Australia.

My Quad- Brown shimmer - #21, Pinky shimmer- #31, Matte brown- #357, Matte nude- #328
Five Palette- Tri Nudes- #101R, Champagne shimmer- #154, Matte grey- #348, Burgundy shimmer- #452, Navy shimmer- #61

Tuesday, 8 July 2014

Find me on Bloglovin!


I'm still getting the hang of this blogosphere thing but today I joined Bloglovin so now I've got all my favourite blogs in one easy feed that I can leisurely read through and spend hours of my life lusting over more makeup and beauty products that I don't need. (need.. pfft. what is need?)

Follow me on bloglovin and leave yours below!

Click the icon on the right to follow my blog >>>


The Debate | To Prime or Not?


"To prime, or not to prime.. That is the question." - Anon

But really, should we be worried about using a primer or just not bother and skip the whole faff completely? I was asking myself this very question maybe 6 months ago before I had really tried a few primers or seen any difference when I had used one for that matter. Beauty brands seem to be bringing out more and more primers these days that are designed to combat various issues and problem points- oiliness, redness, pores, dullness, dehydration, dark spots, pigmentation, textural issues; the list goes on! There are a few brands in particular that have become quite regarded for their primers like Benefit's Porefessional and now their new release for anti-shine as well as Smashbox's wide range of primers combatting almost all of the previously mentioned issues. As well as this, more and more 'accessible' and I suppose drugstore brands are bringing out their own versions of similar products which is what prompted me to write this post. With the release of an awaited 'drugstore' product I felt slightly more well-rounded in the primer world and able to share with the blogosphere my thoughts.

All Over Face
The Hourglass Mineral Veil Primer which I think if I mention once more I'm going to annoy myself for being so boring and anyone who is reading this. I've expressed my love and adoration for this product many times so check out previous posts if you're interested.

L'Oreal Magic Blur- Available from Priceline so it is much more accessible and retails for $24.99. This product created a big hype in the YouTube land as well as all over beauty blogs. It was one of the first drugstore primers to create a wide interest and I waited and waited for it to hit our Australian shores. Months later, during a casual stroll in my local Priceline there it was on the middle shelf just at eye-line for my ease, the Magic Blur! Here to save the day and blur all my imperfections and make me look airbrushed in real life all day everyday. Safe to say I had fairly high hopes for this little tube. I've only used it a few times now and despite this being recommended as an all over face product, I think for my skin type it's better suited to just being focused on problem areas like my t-zone and the pores beside my nose. So far I haven't been overly impressed with how it seems to make my face more oily rather than having the opposite effect that I hoped for. It does fill in the pores so this can fit into two categories of this post but I might do a more detailed post in the future when I've been using it for longer.

Pores
Benefit Porefessional, like the Hourglass primer I don't think I need to say anymore on this product. It is  a cult product for a reason. It fills in the pores to create a more smooth surface and doesn't break up your makeup throughout the day, make my skin more oily nor does it highlight my pores and make them centre of attention.

Innoxa Pore Vanishing Cream A great drugstore dupe for the Benefit Porefessional and does match up pretty well to it's Benefit counterpart. It is still a silicone texture making it great for filling in pores but the texture is slightly (only ever so) to the Benefit. I bought this on recommendation from Australian YouTube gals and was intrigued and excited to try a more affordable product and see if it truly does compare. I would say it is a great alternative, I'm not sure it has the same lasting power as the Benefit but if it is more in your price range then it is a great product but I guess same with a lot of things, the original is often the better.

Eyelids
Urban Decay Primer Potion was the first eye primer I had ever used and I've been using it for probably six months consistently as in I reach for it everyday that I'm wearing makeup, whether it be only eyeliner or a full on eye for a night out. I like to know that whatever I'm putting on my lids is going to stay and not crease if I'm going to put in the time and effort to blend it all in! Plus it's just not the look I want to have my eyeshadow creasing and smudging throughout the day.

Too Faced Shadow Insurance  One of my beautiful pals bought me the Too Faced Blogger Box from Sephora while she was in the States and this was one of the products included. I haven't tried a great deal of Too Faced products, not for any particular reason, just haven't been on my radar too much so I was very excited to have minis of some of their more popular products to test out. In comparison to the Urban Decay it's extremely similar in texture and smell and for me it has the same great lasting power and helps my eyeshadow stay all day and avoid creasing.

On the 'To Try' list are the L'Oreal Lumi Magique which is more for radiating and creating that glowy, dewy skin so I'm reserving that for Winter to brighten up my skin. Also for eyes, my next purchase I think will be the Nars Smudge Proof Eyeshadow base which has been recommended online as well as to me by advisors at beauty counters.

Not so impressed- despite my mentioning them at them beginning of this post, the Smashbox Photo Finish Primers. I got a tester of the original oil-free version from Mecca Maxima and very glad I didn't purchase it because I felt it did more bad than good. My makeup definitely didn't last all day and from memory just broke up especially in my t-zone and around my nose. Not a fan and I don't think I even finished my little tester pot.

Instagram- @beautylocale

Brush Free Makeup


There comes in a point in my week, generally a Sunday when I do my weekly deep clean of my brushes then realise, oh wait I need to go somewhere and therefore need to do my makeup.. or even if I go to do my makeup in the morning, depending on how late I cleaned them, they're not always dry enough for me to be able to use. So came the dilemma but also the solution! After remembering Anna's Post from last year which had obviously been stored in my subconscious because I knew I'd be in this situation months down the track, I felt fairly confident that I could go caveman and have a good go at getting as close to the final effect I would've had with brushes.


So it began. By the way, I'm also considering the Beauty Blender a brush in this instance because it would generally be drying with all my other brushes.

Foundation- pretty obvious, no need for explanation here. My Chanel Mat Lumiere actually recommends using your fingers so that's a bonus that it does blend well. Recently I've also used the new L'Oreal Nude Magique and blended it in with my fingers and I really like the result as it is meant to be a liquid to powder formula so works well in this instance. Something heavier like Estee Lauder Double Wear I think I would avoid in this situation just because of the amount of blending it needs to look fairly natural and seamless. So, base- tick. Again, concealer is pretty self explanatory, I generally apply it with my fingers anyway to warm up the product and blend it in well- tick.

Generally I would go on to my brows next and this is where I may cheat only slightly because both my brow pencils by Maybelline and Hourglass have little spooly brushes on the end so they are still at my disposal. Not entirely sure how i could manage to do tidy brows completely brush free.. they would be quite harsh indeed. Next up, eyes. The obvious choice for this would be a cream product and no surprise I tend to use a Maybelline Colour Tattoo or Benefit's Creaseless Cream Shadow as they're both super easy to apply and blend in with your finger and I have a few different shades. To further intensify the lids, I like to apply either a shadow or pressed pigment because they can be patted on using your ring finger and will generally be quite neat. I like the L'Oreal Infallible Eyeshadows because they have a beautiful shade range and are so buttery to apply. Not as easy to do is a transition shade through the crease so I usually avoid this by just taking my base shadow a bit higher than usual. Eyeliner in the waterline or smudged out with my finger again on the upper lash line then mascara = eyes, tick!

Next is back to the base and bringing some colour back to my cheeks and face. As Anna explains in the post you can use the side part of your hand, below your thumb that connects to your wrist (I hope my overly scientific explanations are clear) to in fact contour because it's the perfect shape to fit in the hollows of your cheeks. So using either a powder bronzer or the Bourjois Bronzing primer I'll do that and then apply a cream blush using patting motions to the apples of my cheeks and drag it upwards towards the hairline for a more flattering look.

If it's a night time look, I'll apply some liquid highlighter like Benefit Sun Beam or a powder to the highpoints of my cheeks and under the brow bone. Finish with a spritz of setting spray because it's a bit difficult to powder and set your face without a brush, and that's it! It's actually quite easy, just make sure you have a makeup wipe handy because it can get a bit messy and you may run out of fingers if you don't.

Let me know if you have any brush-free tricks!

 Instagram- @beautylocale

Sunday, 6 July 2014

Review | L'Occitane Almond Shower Oil


You may have seen me mention L'Occitane on here before or definitely on my instagram. They just get it right when it comes to bodycare in my book. I'm especially a big fan of their hand moisturisers which I always have in my handbag because they come in the perfect size, absorb quickly, are available in beautiful scents and leave my hands feeling nice and nourished. The brand originated in Provence, South of France which is where my Grandma lives so I always love using their products because it makes me think of her, the beautiful fields of lavender and sunflowers and the picturesque countryside.

For Christmas last year I was generously given a large gift set of L'Occitane's Amande range, none of which I had tried before. Someone please tell me where I have been and why I haven't tried anything from it before?! It came with one of the hand moisturisers that I mentioned before which went straight to the handbag, finished it too quickly and I even managed to convert a moisturiser-hater to these because they don't leave your hands feeling greasy or icky but rather fresh and fab smelling. Another goody that came in the gift set was the shower oil which I've definitely seen on the beautysphere- be it Instagram, YouTube or blogs, I'm positive I've seen this quite a bit. Thing is that it is a bit pricey so I don't think I would've really be inclined to spend that much myself on a body wash but now that I've been exposed, nothing else will ever do. Spoiler alert: this stuff is the bomb.com. I use it together with  my Body Shop exfoliating body polisher  which is a nylon towel that can be washed so it's great for daily use. Two pumps of the oil onto the towel, it'll lather up a little and you will hear the angels sing. It not only smells absolutely divine but it leaves your skin feeling like nothing I've ever used in the shower. Admittedly this is my first shower oil but I've used similar products and a few in-shower moisturisers but no, they do not hold a candle to this lil beauty. Your skin feels nourished and hydrated and no surprise, it smells fab; I don't find the scent lingers too long throughout the day on my skin but could just be me or maybe I just can't smell it on myself. 

What they say: A customer favourite. Transforms into a lavish, softening foam--original and unique in texture--that leaves a satin-like softness all over the body. Rich in almond oil and nourishing lipids. Cleanses gently to impart a delectable perfume. Keep handy in bath or shower as an extra-pampering alternative to Shea Butter Soap and our fragrance soaps.

What I say: As I said, I don't see myself using anything else for a good while because this just is an amazing product. They say you can also use it as a shaving base so I'll give that a go as well. The fact that this gives my skin added moisture than a standard body wash and cuts down on steps for me in the morning, I am more than keen for. Also as an award winner, you can't go wrong! 

L'Occitane Almond Shower Oil is priced from $36

Tuesday, 1 July 2014

Must Have | Wet 'n' Wild Comfort Zone Palette


I'm not sure how this palette became so popular or how it got to earn a 'must have' status but I am jumping on the band wagon! Before buying this palette I'd tried lipsticks from Wet n Wild and loved them especially at under $2, crazy good buy!

Right side
Left side

The Comfort Zone palette has two 'looks' and each shade has its use printed into it- browbone, crease etc so makes it perfect for beginners or eyeshadow nubies. In saying that though, I don't play by the rules with this one I do what I want and just use the colours where I'd like to. I recently did a night look using predominantly the bottom-right shade (Definer) which has been dubbed a dupe for MAC's blue brown pigment and regardless of that it's a beaut. As you can see from my swatches the colours come out beautifully, they're opaque and build up nicely too. They may seem like colours you wouldn't usually go for with the greens and deep reds but I recommend if you're looking at buying some US drugstore makeup, add this one to your cart and give it a go I don't think you'll be disappointed.

Sorry about the iPhone quality but this is an eye look I did weeks ago using the Bottom Right shade
Wet n Wild do a lot more palettes in either quads or eight pan so I'm curious to try their other shades. I like the way they've paired shadows together for you because some seem like an odd combination but do work beautifully together or if you're not a fan of them as a combo, you can just treat them as 8 single shadows! Recently I've been reaching for the top left champagne shimmer shade as an everyday brow highlight and really been liking it. At $14.95 AU (or around $5US) you really can't go wrong with having this palette in your stash. 
Follow on Bloglovin